One of the first things I did with my E30 was changing the fuel pump. My Australian '89 318i has 1 in-tank pump located under the rear seat cushion, on the right side. The last thing I wanted was for the fuel pump to die when I was in a hurry to get somewhere and then be stuck on the side of the road. It's a fairly simple job which can be done by the amateur DIY'er. It's really just a 1 hour job but if it's your first time, allow yourself about 3 hours.
Symptoms of a soon to fail fuel pump:
Options for replacement fuel pump:
The OEM pump was ruled out straight away simply because it has a lower flow-rate which doesn't allow for any future modifications where higher fuel flow may be required and is $50 more expensive than the other two. However, if you've got a stock-standard car and want to keep it that way, you're probably better off spending the extra money for the Bosch - simply because they make the most durable fuel pumps.
Walbro is very well known in the aftermarket/ performance fuel pump scene. They've been around for a while and earned themselves a good reputation. All their pumps come with a 1-year warranty and they're known to perform.
Ebay and Amazon are loaded with generic brand aftermarket fuel pumps. One such brand that I found on Ebay was TRE Performance. These generic brand of pumps are designed just like Walbros and have identical model numbers to suit various vehicles. Difference is that they're a bit cheaper and have slightly higher fuel flow rates. They've also got a better warranty than Walbro. 1-year replacement warranty, AND a 30-day money back guarantee.
After doing some research on internet forums and reading about people's experiernces with these pumps, the High Flow was the obvious winner. Although Walbro are the bigger name, a lot of people have commented that they are noisy. If your car is a daily driver, this can be a particularly important factor to consider.
So to sum it up, the TRE-340 is the best e30 fuel pump for the money. Those who have used the TRE don't seem to have any complaints. I've had the same TRE pump in my car since June 2010 (it's now September 2011), and I've had absolutely no problems. Not only that, I have NEVER heard it! It's reasonably priced, high fuel flow, dead quiet, and easy to install.
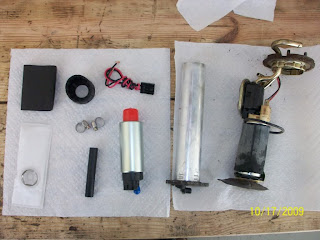
Tools Required:
1. Locate the fuel pump.
Remove the back seat cushion and the insulation under it. The back seat cushion should come off by just sharply pulling upwards on the front end of the cushion. You might want to vacuum clean the area under the seat at this point. You'll probably find some coins and other small items that mysteriously went missing from the back of your car. There will be an oval shaped black plastic panel held by 4 phillip's screws. Undo the screws and remove this panel to reveal the top of your in-tank fuel pump. Use a soft sponge/cloth to clean this area with the car detailing spray and make sure the area around the fuel pump is clean before you proceed. You want to minimise the amount of dirt/dust that gets into your fuel tank while the fuel pump is out.

2. Remove the fuel gauge sender.
Disconnect the electrical connectors for the fuel pump and the fuel gauge sender. Take a picture of how the hoses are connected to the fuel pump cradle, and then disconnect the hoses by loosening the hose clamps as required. My hose clamps were very old and had become brittle - they just snaped off so I had to replace them with new ones. Undo the 4 nuts that hold the fuel gauge sender to the fuel pump cradle and lift it out. Make sure you have some thick rags/towels handy because if there's fuel in the tank, the fuel sender is going to be dripping with fuel. You don't want fuel spillage anywhere inside your car!


4. Disassemble the old fuel pump from the cradle. Have a good look at the items included with your new pump and also at how the old fuel pump is assembled in the cradle. You should already have an idea how you're going to fit the new pump in the cradle. Also note how the filter is fitted at the bottom and which direction it is facing. The filter will come off with a firm pull - you can also pry it with a flat screw driver.


6. Remove the old wires and solder in the new connector. Take note of which terminals are the +ve and -ve on the cradle. Typically, red = +ve and black = -ve. Use the soldering iron and some new solder to melt off the old wires from the terminals at the top of the cradle. BE CAREFUL NOT TO MELT THE PLASTIC PIECE SEPARATING THE + and - terminals! By test fitting the new fuel pump, cut the new connector wires to the right length and allow an extra 2-3cm in length - It's ok if the wire is too long but you don't want it too short. Then strip the tips to reveal their cores and solder them in ensuring that the +ve and -ve wires are soldered to the correct terminals. BE CAREFUL NOT TO MELT THE PLASTIC PIECE SEPARATING THE + and - terminals!

7. Prepare the new fuel pump for fitting. Put the rubber insulation jackets on the fuel pump. There is one shorter one for the bottom of the fuel pump, and another one to cover the rest of it. First put the bottom one on and then slide the longer one on from the other end. Make sure that all of the fuel pumps sides are covered - see the picture below.
8. Fit the new rubber hose. Test fit the new fuel pump and cut the replacement hose to the right length. The length should be so that when the hose is fully pushed down onto the fuel pump, the other end of the hose should come up to near the bend in the piping on the cradle - see picture below. Then push the hose as far as possible onto the cradle - even up along the bend in the piping and slide both the included hose clamps onto the hose sitting loosely. Then fit the new fuel pump onto the cradle, slide the hose down over the pump nozzle, and then tighten the hose clamps at each end of the hose to secure it.

9. Fit the new filter onto the bottom of the fuel pump. Just have to push it on firmly. Make sure that the long end of it is facing the same direction as the old filter.
10. Install the new fuel pump in the car. Simply do the reverse of how you removed it to reinstall it. Re-connect the hoses connecting to the piping on top of the cradle and tighten the hose clamps. Re-install the fuel gauge sender and tighten the 4 nuts to secure it in place. When tightening these nuts, be careful to not over-tighten and strip the threads. Join the electrical connectors for the fuel gauge sender and the fuel pump. START THE CAR to make sure it's all working fine! Put the black cover back on and tighten the 4 screws to secure it. To put the back-seat back on, simply line up the clips on the under side of the seat to the clips on the car body and push down on the seat to secure it in place.
Acknowledgements:
Symptoms of a soon to fail fuel pump:
- Noise - a dieing fuel pump will make a constant humming/buzzing noise when running, which will be very clearly audible from inside the cabin. Some aftermarket fuel pumps are known to do this just when the car first starts up but the noise goes away after the engine has been running for a few minutes.
- Difficulty starting - The engine turns and the sparks are all working but the engine doesn't want to fire or it starts with some difficulty, coughing and sputtering.
- Erratic idling - When idling, the RPM's seem to dance up and down as though someone is slightly revving the engine on and off from a lower than normal idle speed.
- Fouled spark plugs - If your fuel pump isn't getting enough fuel to the engine, the engine will be running a leaner fuel mixture (lower fuel:air ratio). A long term effect of running on a lean fuel mixture is fouled spark plugs.
- Abrupt stalling/jerking - While driving, you may notice the engine stall or almost cut out. Fuel isn't the only possible cause.
Options for replacement fuel pump:
- BMW OEM (Bosch) - $170
- Walbro 255LPH GSS340 - $120
- Generic Brand 340 255LPH High Performance Fuel Pump - $70-120.
The OEM pump was ruled out straight away simply because it has a lower flow-rate which doesn't allow for any future modifications where higher fuel flow may be required and is $50 more expensive than the other two. However, if you've got a stock-standard car and want to keep it that way, you're probably better off spending the extra money for the Bosch - simply because they make the most durable fuel pumps.
Walbro is very well known in the aftermarket/ performance fuel pump scene. They've been around for a while and earned themselves a good reputation. All their pumps come with a 1-year warranty and they're known to perform.
Ebay and Amazon are loaded with generic brand aftermarket fuel pumps. One such brand that I found on Ebay was TRE Performance. These generic brand of pumps are designed just like Walbros and have identical model numbers to suit various vehicles. Difference is that they're a bit cheaper and have slightly higher fuel flow rates. They've also got a better warranty than Walbro. 1-year replacement warranty, AND a 30-day money back guarantee.
After doing some research on internet forums and reading about people's experiernces with these pumps, the High Flow was the obvious winner. Although Walbro are the bigger name, a lot of people have commented that they are noisy. If your car is a daily driver, this can be a particularly important factor to consider.
So to sum it up, the TRE-340 is the best e30 fuel pump for the money. Those who have used the TRE don't seem to have any complaints. I've had the same TRE pump in my car since June 2010 (it's now September 2011), and I've had absolutely no problems. Not only that, I have NEVER heard it! It's reasonably priced, high fuel flow, dead quiet, and easy to install.
Tools Required:
- Phillip's Head (Cross-Head) Screw Driver.
- Lots of rags/ towels.
- Car detailing/ cleaning spray.
- Vacuum cleaner.
- Ratchet
- Socket set including some very small sockets around 4-10mm's.
- Small 8-13mm hose clamps (as required).
- Soldering iron.*
- Heat-shrink and hot air gun.*
- Die-grinder or flat file.*
1. Locate the fuel pump.
Remove the back seat cushion and the insulation under it. The back seat cushion should come off by just sharply pulling upwards on the front end of the cushion. You might want to vacuum clean the area under the seat at this point. You'll probably find some coins and other small items that mysteriously went missing from the back of your car. There will be an oval shaped black plastic panel held by 4 phillip's screws. Undo the screws and remove this panel to reveal the top of your in-tank fuel pump. Use a soft sponge/cloth to clean this area with the car detailing spray and make sure the area around the fuel pump is clean before you proceed. You want to minimise the amount of dirt/dust that gets into your fuel tank while the fuel pump is out.

2. Remove the fuel gauge sender.
Disconnect the electrical connectors for the fuel pump and the fuel gauge sender. Take a picture of how the hoses are connected to the fuel pump cradle, and then disconnect the hoses by loosening the hose clamps as required. My hose clamps were very old and had become brittle - they just snaped off so I had to replace them with new ones. Undo the 4 nuts that hold the fuel gauge sender to the fuel pump cradle and lift it out. Make sure you have some thick rags/towels handy because if there's fuel in the tank, the fuel sender is going to be dripping with fuel. You don't want fuel spillage anywhere inside your car!
3. Remove the fuel pump.
Turn the fuel pump assembly and lift it out carefully. This can be rather fiddly so you might want to get a friend to capture on video how you take it out because you'll have to do the reverse of this to get it back in later. Again - make sure you have lots of thick rags/towels so that you don't spill any fuel inside your car! There should be a rubber washer/gasket that sits between the top of the fuel pump assembly and the fuel tank. Keep this to re-use later or replace it if necessary. Once the fuel pump is out, use a clean rag/towel to cover the hole and make sure you leave your car with its doors/windows wide open and well ventilated while it's waiting to get the new pump installed.


5. Grind or file the protruding lip on the bottom of the cradle.

6. Remove the old wires and solder in the new connector. Take note of which terminals are the +ve and -ve on the cradle. Typically, red = +ve and black = -ve. Use the soldering iron and some new solder to melt off the old wires from the terminals at the top of the cradle. BE CAREFUL NOT TO MELT THE PLASTIC PIECE SEPARATING THE + and - terminals! By test fitting the new fuel pump, cut the new connector wires to the right length and allow an extra 2-3cm in length - It's ok if the wire is too long but you don't want it too short. Then strip the tips to reveal their cores and solder them in ensuring that the +ve and -ve wires are soldered to the correct terminals. BE CAREFUL NOT TO MELT THE PLASTIC PIECE SEPARATING THE + and - terminals!

7. Prepare the new fuel pump for fitting. Put the rubber insulation jackets on the fuel pump. There is one shorter one for the bottom of the fuel pump, and another one to cover the rest of it. First put the bottom one on and then slide the longer one on from the other end. Make sure that all of the fuel pumps sides are covered - see the picture below.
8. Fit the new rubber hose. Test fit the new fuel pump and cut the replacement hose to the right length. The length should be so that when the hose is fully pushed down onto the fuel pump, the other end of the hose should come up to near the bend in the piping on the cradle - see picture below. Then push the hose as far as possible onto the cradle - even up along the bend in the piping and slide both the included hose clamps onto the hose sitting loosely. Then fit the new fuel pump onto the cradle, slide the hose down over the pump nozzle, and then tighten the hose clamps at each end of the hose to secure it.

9. Fit the new filter onto the bottom of the fuel pump. Just have to push it on firmly. Make sure that the long end of it is facing the same direction as the old filter.
10. Install the new fuel pump in the car. Simply do the reverse of how you removed it to reinstall it. Re-connect the hoses connecting to the piping on top of the cradle and tighten the hose clamps. Re-install the fuel gauge sender and tighten the 4 nuts to secure it in place. When tightening these nuts, be careful to not over-tighten and strip the threads. Join the electrical connectors for the fuel gauge sender and the fuel pump. START THE CAR to make sure it's all working fine! Put the black cover back on and tighten the 4 screws to secure it. To put the back-seat back on, simply line up the clips on the under side of the seat to the clips on the car body and push down on the seat to secure it in place.
Acknowledgements:
M42club forum user: jrw21.
Images were taken from a post on 18 Oct 2009,
on forum thread titled: DIY Fuel Pump Replacement.
on forum thread titled: DIY Fuel Pump Replacement.